

| Drill Bushings Tolerances | |
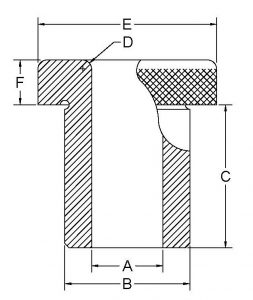
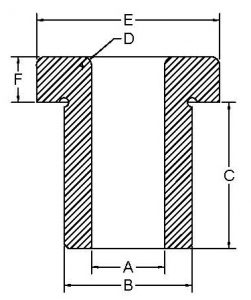
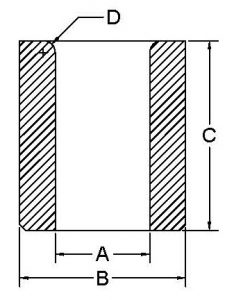
| Standard ID Tolerances (A) | |
| 0.0135 to 1/4” | +.0001 / +.0004 |
| Over 1/4” to 3/4” | +.0001 / +.0005 |
| Over 3/4” to 1-1/2” | +.0002 / +.0006 |
| Over 1-1/2” to 2-3/4” | +.0003 / +.0007 |
| Standard OD Tolerances (B) | ||
| Nominal | Max | Min |
| 5/32” | .1578 | .1575 |
| 13.64” | .2046 | .2043 |
| 1/4” | .2516 | .2513 |
| 5/16” | .3141 | .3138 |
| 13/32” | .4078 | .4075 |
| 1/2″ | .5017 | .5014 |
| 5/8” | .6267 | .6264 |
| 3/4” | .7518 | .7515 |
| 7/8” | .8768 | .8765 |
| 1 | 1.0018 | 1.0015 |
| 1-3/8” | 1.3772 | 1.3768 |
| 1-3/4” | 1.7523 | 1.7519 |
| 2-1/4” | 2.2525 | 2.2521 |
| Standard Length Tolerance (C) |
| + /- 1/64” |
| Standard Head Tolerances, for H, SF Type |
| Head Diameter (E) +/- 1/64” |
| Head Thickness (F) +/- 1/64” |
| Standard Lead in Radius (D) | |
| For Body Diameter (B) | Minimum Radius (D) |
| 5/32” to 1/4” | 1/64” |
| 5/16” to 13/32” | 1/32” |
| 1/2″ to 5/8” | 3/64” |
| 3/4″ to 7/8” | 1/16” |
| 1” to 2-1/4” | 3/32” |
| Standard Concentricity, ID to OD (A to B) |
| .0005” T.I.R. |
